morse sewing machine manual
The Morse sewing machine manual is an essential guide for users, providing detailed instructions for operation, maintenance, and troubleshooting. It ensures optimal performance and longevity of the machine, offering step-by-step guidance on threading, stitching, and accessory usage. The manual is available for download from trusted sources, including official websites and authorized retailers, making it easily accessible for sewists of all skill levels. By following the manual, users can master their Morse sewing machine and achieve professional-quality results in their sewing projects.
1.1 Overview of the Manual and Its Importance

The Morse sewing machine manual is a comprehensive guide designed to help users maximize the potential of their machine. It covers essential topics such as threading, stitching, and maintenance, ensuring seamless operation. Whether you’re a novice or an experienced sewist, the manual provides clear instructions to enhance your sewing experience. Its importance lies in preventing errors and prolonging the machine’s lifespan. The manual also includes troubleshooting tips and detailed diagrams for model-specific instructions. Available in downloadable formats, it offers convenience and accessibility, making it an indispensable resource for anyone owning a Morse sewing machine. By following the manual, users can achieve professional-quality results and maintain their machine effectively.

History of Morse Sewing Machines
Morse sewing machines have a rich history, evolving from early mechanical models to advanced electronic designs. Their development reflects innovation in sewing technology, with models like the Fotomatic III and 4400 becoming iconic for their versatility and precision stitching. Over the years, Morse machines have earned a reputation for durability and reliability, catering to both home sewists and professional tailors. Their legacy continues to inspire modern sewing enthusiasts, making them a trusted name in the industry.
2.1 Evolution of Morse Sewing Machine Models
Morse sewing machines have undergone significant evolution, starting from basic mechanical models to advanced electronic versions. Early models like the Morse Model 200 and 300 were known for their simplicity and durability, catering to essential sewing needs. The introduction of the Fotomatic III and 4400 models marked a shift toward automatic features, including zigzag stitching and buttonhole capabilities. These models became popular for their versatility and ease of use. Later iterations, such as the Apollo 6400, incorporated modern technology like digital controls and specialized stitch patterns. This progression reflects Morse’s commitment to innovation, ensuring their machines remain relevant in the ever-changing sewing landscape.
2.2 Key Milestones in the Development of Morse Sewing Machines
The development of Morse sewing machines has been marked by significant innovations. The introduction of the Fotomatic III in the 1970s revolutionized sewing with automatic features like zigzag stitching and buttonhole capabilities. The 4400 Fotomatic IV, released in the 1980s, further enhanced functionality with electronic controls and expanded stitch patterns. The Apollo 6400, introduced in the 1990s, brought digital controls and specialized stitching options, catering to both home and professional users. Each milestone reflected advancements in technology and user-centric design, solidifying Morse’s reputation for reliability and innovation in the sewing industry. These developments have made Morse sewing machines indispensable for sewists seeking precision and versatility.
Manual Overview
The Morse sewing machine manual provides comprehensive guidance, covering machine setup, operation, and maintenance. It includes detailed diagrams, troubleshooting tips, and model-specific instructions for optimal performance and longevity.
The Morse sewing machine manual is a detailed guide designed to help users understand and utilize their machine effectively. It begins with an introduction to the machine’s features and components, ensuring users are familiar with every part. The manual then progresses to operational instructions, covering basic functions such as threading, bobbin winding, and stitch selection. Advanced features, like creating buttonholes and sewing in reverse, are also explained with clear, step-by-step instructions. Additionally, the manual includes maintenance tips, such as cleaning, oiling, and adjusting thread tension, to ensure the machine runs smoothly. Troubleshooting sections address common issues, providing solutions to keep the machine in optimal condition. By following the manual, users can unlock their machine’s full potential and enjoy a seamless sewing experience. To navigate the Morse sewing machine manual effectively, start by reviewing the table of contents to identify relevant sections. Use the index to locate specific topics quickly, such as threading instructions or troubleshooting. Pay attention to model-specific sections, as some features may vary. Visual aids like diagrams and images can help clarify complex steps. For beginners, focus on the basic operation and maintenance chapters first. Experienced users can skip to advanced features or troubleshooting guides. Bookmark frequently used pages or take notes for easy reference. By organizing your approach, you can efficiently find the information you need, ensuring a smooth sewing experience. This structured navigation helps maximize the manual’s utility and enhances your sewing skills. The Morse sewing machine manual includes model-specific instructions to cater to the unique features of each machine. For instance, the Fotomatic III and Super Dial models have distinct operation guides, with the former focusing on automatic buttonhole settings and the latter emphasizing dial-controlled stitch selection. Variations in features like zigzag stitching, thread tension adjustment, and bobbin winding are highlighted in separate sections; Users should refer to the model-specific chapters to ensure proper operation, as some functions may not apply to all machines. Additional resources, such as diagrams and troubleshooting tips, are tailored to each model, providing clarity and ease of use. Always verify your machine’s model number to access the most relevant instructions. Setting up your Morse sewing machine involves unboxing, initial inspection, threading, bobbin winding, and needle installation. Follow the manual’s step-by-step guide for a smooth setup experience. When unboxing your Morse sewing machine, carefully remove it from the packaging and inspect for any visible damage or defects. Ensure all accessories, such as the power cord, foot pedal, and additional attachments, are included. Refer to the manual for a detailed list of components. Examine the machine’s exterior and interior for dust or debris that may have accumulated during shipping. Check the stitch selector, bobbin area, and needle bar for proper alignment and functionality. If any parts are missing or damaged, contact the supplier immediately. This initial inspection ensures your machine is ready for setup and operation, preventing future issues. Proper threading is crucial for smooth operation. Begin by locating the spool pin and gently pull the thread to remove any twists. Insert the thread through the tension discs, ensuring it’s seated correctly. Guide the thread through the take-up lever, moving it upward to create slight tension. Next, pass the thread through the channel near the needle bar, looping it around the needle clamp; Finally, thread the needle from front to back. Maintain a steady hand and avoid pulling too tightly, which could misalign the tension. Refer to the manual’s diagrams for visual guidance. Proper threading ensures consistent stitches and prevents mechanical issues during sewing. To wind the bobbin, place it on the winder and pull the thread to remove any slack. Guide the thread through the bobbin winding guide and gently press the foot pedal to start winding. Keep the thread taut but not overly tight to maintain even tension. Once the bobbin is full, cut the thread and remove it from the winder. Next, locate the bobbin case and insert the wound bobbin, ensuring it clicks into place. Pull the thread gently to seat it properly in the machine. This step is crucial for consistent stitching and prevents thread jams or uneven tension. Always refer to the manual for specific bobbin installation instructions tailored to your Morse model. Installing the needle correctly is a critical step for proper machine function. Begin by turning off and unplugging your Morse sewing machine for safety. Locate the needle clamp screw, usually found near the needle bar. Loosen the screw slightly using the provided screwdriver. Carefully remove the old needle by pulling it straight down. Insert the new needle, ensuring the flat side faces the correct direction as specified in your manual. Tighten the screw firmly to secure the needle in place. Test the machine with a scrap piece of fabric to ensure the needle is properly aligned and functioning smoothly. Incorrect needle installation can lead to uneven stitching or damage to the machine, so precision is key. Operating the Morse sewing machine involves mastering basic stitches, selecting patterns, and utilizing advanced features like reverse sewing and buttonhole creation. The manual provides clear guidance on these functions, ensuring smooth and efficient sewing experiences for all skill levels. The Morse sewing machine manual details various basic stitches, each serving specific purposes. The straight stitch is ideal for general sewing and repairs, while the zigzag stitch is perfect for preventing fraying on fabric edges. The manual also covers the reverse stitch, which reinforces seams by sewing backward. Additionally, it explains the blind hem stitch, great for invisible hems, and the buttonhole stitch, essential for creating professional-looking buttons. Understanding these stitches enhances sewing versatility, allowing users to tackle a wide range of projects with ease and precision. The manual provides clear instructions, ensuring users can master each stitch quickly. The Morse sewing machine manual guides users through selecting and utilizing various stitch patterns to suit their sewing needs. From the basic straight stitch to decorative zigzag patterns, the manual explains how to navigate the stitch selector dial or electronic controls. It details how to adjust stitch length and width for different fabrics, ensuring precise results. Specialized stitches, such as the buttonhole and blind hem stitches, are also covered, with step-by-step instructions for achieving professional finishes. The manual emphasizes the importance of matching the right stitch to the fabric type for optimal outcomes. By mastering these stitch patterns, users can enhance their sewing projects with creativity and versatility, making the most of their Morse sewing machine’s capabilities. Sewing in reverse with your Morse sewing machine is a handy feature for reinforcing seams and preventing fraying. The manual provides clear instructions on how to engage the reverse stitch function, ensuring secure stitching at the beginning or end of a seam. It advises users to gently guide the fabric while sewing in reverse to maintain control and avoid bunching. Adjusting the stitch length and tension is also covered to ensure even, consistent reverse stitches. For models like the Fotomatic IV, the manual highlights specific settings for optimal reverse stitching performance. By mastering reverse sewing, users can add durability and professionalism to their projects, making it an essential skill for any sewist. The Morse sewing machine manual provides detailed guidance on creating professional-looking buttonholes with ease. For models like the Fotomatic IV, the manual outlines the automatic buttonhole feature, allowing users to sew perfect buttonholes in minutes. It recommends using the buttonhole foot and stabilizing the fabric with interfacing to prevent stretching. The manual also includes step-by-step instructions for manual buttonhole stitching on older models, ensuring versatility for all users. Tips on aligning the fabric correctly and using the buttonhole setting are emphasized to achieve precise results. By following these instructions, users can create durable, evenly spaced buttonholes that enhance the finish of their sewing projects. Regular cleaning, oiling, and thread tension adjustments ensure optimal performance. The manual guides users through common issues like thread breakage and error prevention, prolonging machine life. Cleaning your Morse sewing machine is crucial for maintaining its efficiency and extending its lifespan. Use a soft, dry brush to gently remove dust and lint from the machine’s exterior and internal components. Pay special attention to the bobbin case, feed dogs, and thread pathways, as these areas tend to accumulate debris. For more thorough cleaning, use compressed air to blow out trapped particles. Avoid using liquids or harsh chemicals, as they may damage the machine’s finish or internal mechanisms. Regular cleaning ensures smooth operation, prevents thread jams, and maintains stitch quality. Always turn off and unplug the machine before cleaning. By incorporating this routine, you can keep your Morse sewing machine in pristine condition and ready for your next project. Regular oiling is essential to keep your Morse sewing machine running smoothly and quietly. Use high-quality sewing machine oil specifically designed for this purpose. Apply a few drops to the bobbin hook area, feed dog mechanism, and any moving metal parts. Oil should be applied after cleaning or every 50 hours of use. Turn the handwheel gently to distribute the oil evenly across internal components. Avoid over-oiling, as excess can attract dust and create residue. For models like the Fotomatic III or Super Dial, refer to the manual for specific oiling points. Proper lubrication ensures consistent stitching, prevents friction damage, and extends the machine’s lifespan. Always unplug the machine before oiling for safety. Proper thread tension ensures even, consistent stitching on your Morse sewing machine. Locate the tension dials on the machine, typically found on the front or top. Turn the dials clockwise to increase tension or counterclockwise to decrease it. Always test stitches on a scrap fabric after adjustments. For light fabrics, use lower tension, and for heavy fabrics, increase it. Refer to the manual for specific settings. If stitches are uneven or loops form, adjust the bobbin tension accordingly. Clean and oil the machine before making tension adjustments. Incorrect tension can lead to poor stitch quality or machine jamming. Regularly check and adjust tension for optimal performance. Ensure both upper and lower thread tensions are balanced for professional results. Common issues with Morse sewing machines include thread tangling, uneven stitches, and machine jamming. To address these, first, check for loose threads or debris in the machine. Ensure the needle is correctly installed and the bobbin is properly wound. If stitches are uneven, adjust the thread tension dials or clean the tension discs. For jams, gently remove the fabric and clear any thread blockages. Always refer to the manual for specific troubleshooting steps. Regular cleaning and oiling can prevent many issues. If problems persist, consult a professional or authorized service center. By addressing these common issues promptly, you can maintain smooth operation and extend the life of your machine. Regular maintenance is key to preventing errors and extending the life of your Morse sewing machine. Always clean the machine with a soft cloth, removing dust and lint from crevices. Lubricate moving parts periodically with the recommended oil to ensure smooth operation. Avoid using excessive force, which can damage internal mechanisms. Store the machine in a dry, cool place to prevent rust and electrical issues. Follow the manual’s guidelines for threading and needle replacement to avoid misalignment. Address minor issues promptly, such as uneven stitches or thread tension problems, to prevent them from escalating. By adhering to these practices, you can ensure your Morse sewing machine remains reliable and efficient for years to come. Morse sewing machine accessories, like bobbins, needles, and specialized feet, enhance functionality. Genuine parts ensure compatibility and optimal performance. Available through authorized retailers and online platforms. Essential accessories for your Morse sewing machine include high-quality bobbins, needles, and presser feet, which are designed to enhance stitching accuracy and versatility. Additional accessories like embroidery hoops, quilting attachments, and specialized feet for zippers or buttons can expand your sewing capabilities. Genuine Morse parts ensure compatibility and optimal performance. Regularly maintaining and replacing worn-out accessories can prevent damage to your machine and ensure consistent results. Always purchase accessories from authorized retailers to guarantee authenticity and quality. Proper storage and organization of these parts will prolong their lifespan and keep your sewing workspace efficient. These accessories are vital for achieving professional-grade stitching and maximizing your sewing machine’s potential. When deciding between generic and genuine parts for your Morse sewing machine, consider cost, quality, and compatibility. Genuine parts are designed specifically for your machine, ensuring optimal performance and longevity, while generic parts may offer cost savings but could compromise on quality or fit. Genuine parts are backed by warranties and are recommended for maintaining your machine’s performance. However, generic alternatives can be more affordable and may work adequately for basic sewing tasks. Always research the source of generic parts to ensure reliability. For critical components, genuine parts are the safer choice to avoid potential damage or malfunctions. Balancing budget and quality is key to making the right decision. Replacement parts and accessories for Morse sewing machines can be sourced from various online retailers, sewing specialty stores, and official Morse distributors. Platforms like Amazon, Etsy, and eBay offer a wide range of genuine and generic parts, including bobbin cases, needles, and tension discs. Additionally, vintage sewing machine enthusiasts often find rare parts on niche forums or antique sewing machine communities. Official Morse websites and authorized dealers provide authentic components, ensuring compatibility and quality. When purchasing online, verify seller ratings and reviews to ensure authenticity. Local sewing shops may also carry or order specific parts for your Morse model. Always prioritize reputable sources to maintain your machine’s performance and longevity. The Morse sewing machine manual is readily available for download from trusted sources like official websites, sewing forums, and online marketplaces such as Amazon and Etsy. Instant access is often provided after purchase, ensuring users can quickly reference instructions for operation, maintenance, and troubleshooting. Downloadable formats typically include PDFs, making it easy to view and print specific sections as needed. Before downloading, verify the source’s reliability to ensure the manual’s authenticity and relevance to your specific Morse model. This convenient access helps users maintain and optimize their sewing machine’s performance efficiently. Reliable sources for downloading the Morse sewing machine manual include official manufacturer websites, trusted online marketplaces like Amazon and Etsy, and specialized sewing forums. Amazon offers digital manuals for various Morse models, such as the Fotomatic III and Super Dial, often verified for quality. Etsy provides vintage and hard-to-find manuals, ideal for older models. Sewing communities and forums also share free PDF downloads, ensuring accessibility for all users. Always verify the seller’s ratings and reviews to avoid low-quality scans. These sources guarantee authentic and comprehensive guides, essential for proper machine operation and maintenance. By using trusted platforms, users can confidently download the manual tailored to their specific Morse sewing machine model. To download the Morse sewing machine manual, start by identifying your specific model, such as the Fotomatic III or Super Dial. Visit trusted websites like Amazon, Etsy, or specialized sewing forums. Search for your model’s manual using keywords like “Morse sewing machine manual PDF.” Select a reliable source, ensuring it offers high-quality, complete versions. For paid manuals, proceed to checkout, using secure payment methods like PayPal or credit cards. After payment, you’ll be redirected to download the PDF. For free downloads, click the provided link and save the file. Ensure your device has a PDF reader to access the manual. Follow these steps to securely and efficiently obtain your Morse sewing machine manual. When downloading the Morse sewing machine manual, issues may arise. If the download doesn’t start, check the link for accuracy or try a different source. Ensure your internet connection is stable to avoid interrupted downloads. For payment-related issues, verify your payment method or contact the vendor’s support team. If the manual appears incomplete, ensure the file is fully downloaded or request a replacement. Compatibility issues with your device may require a PDF reader update. If the manual fails to open, check for virus software blocking the download or scan the file for malware. For unresolved problems, contact the provider’s customer service for assistance. Troubleshooting these common issues ensures you can access the manual without delay.3.1 Understanding the Contents of the Manual
3.2 How to Navigate the Manual Effectively
3.3 Model-Specific Instructions and Variations
Setting Up Your Morse Sewing Machine
4.1 Unboxing and Initial Inspection
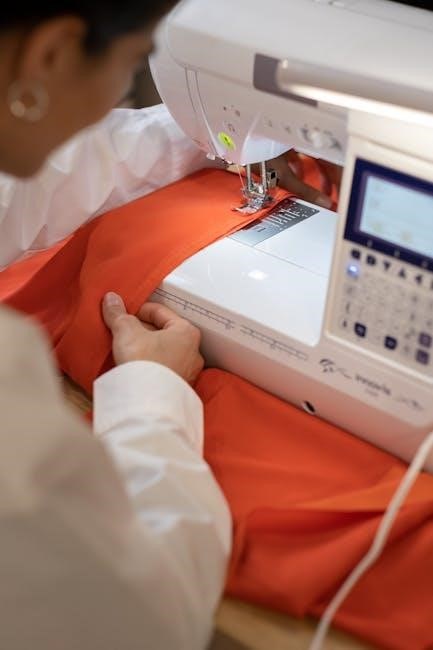
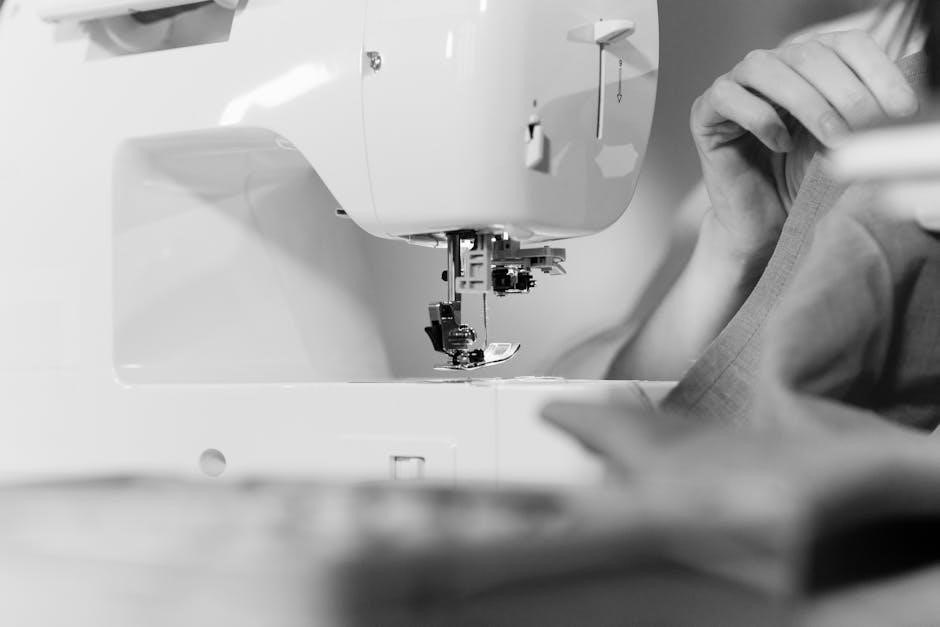
4.2 Threading the Machine: A Step-by-Step Guide
4.3 Winding and Installing the Bobbin
4.4 Installing the Needle Correctly
Operating the Morse Sewing Machine
5.1 Basic Stitches and Their Functions
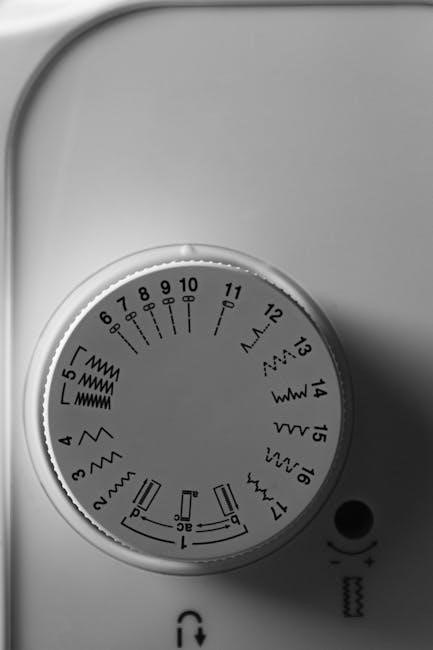
5.2 Selecting and Using Different Stitch Patterns
5.3 Sewing in Reverse: Tips and Tricks
5.4 Creating Buttonholes Effortlessly
Maintenance and Troubleshooting
6.1 Cleaning the Machine for Optimal Performance
6.2 Oiling the Machine: When and How
6.3 Adjusting Thread Tension for Perfect Stitches
6.4 Common Issues and How to Fix Them
6.5 Preventing Errors and Prolonging Machine Life
Accessories and Parts
7.1 Essential Accessories for Your Morse Sewing Machine
7.2 Using Generic vs. Genuine Parts: Pros and Cons
7.3 Where to Find Replacement Parts and Accessories
Downloading the Morse Sewing Machine Manual
8.1 Reliable Sources for Downloading the Manual

8.2 Step-by-Step Guide to Downloading the Manual
8.3 Troubleshooting Common Download Issues